Jumping in at the deep end: building a high-spec gaming PC as your first
The build process, and my thoughts on the NZXT H9 Flow
So, after bringing all the components together for a nice family photo, I actually had the task of attempting to put them all together. The actual process itself was always described to me as being like putting Lego together, because you're slotting one piece into another and putting it all together in a matter of hours while carefully following instructions. There are some Lego-worthy comparisons here, especially on the point of attemping to follow instructions to the letter, getting it wrong, and going back and realising you were a complete idiot in the first place. Or is that just me?
To be truthful, I followed some semblance of PC building advice from Will's article on how to build a white gaming PC, in terms of building as much as possible outside of the case - really loading up that motherboard - before putting it all together. However, I didn't actually fire up the machine until it was into the case, which admittedly could have caused some headaches if I needed to take everything back out again to troubleshoot any issues. I also perhaps did things in a slightly different order than you might expect, putting all of the 10 (!) fans inside first, getting their cables routed where they needed to go, and only then putting in the more critical components.
While routing the fan cables into their respective positions and making sure fans were screwed in the right way, I had a sense of impending dread in my head about what I was about to do. If one thing went wrong, be it bent pins for a processor or if I somehow dropped a £1500 graphics card, I'd never live it down in my own head. All I could do really was best prepare with guidance such as Will's article, as well as a few YouTube videos on using the NZXT H9 Flow case I'd elected to build in to see how other people had done it. I also meticulously read instruction manuals and followed manufacturer guidance where possible, where I'd normally be someone to discard manuals as soon as I find them in the box.

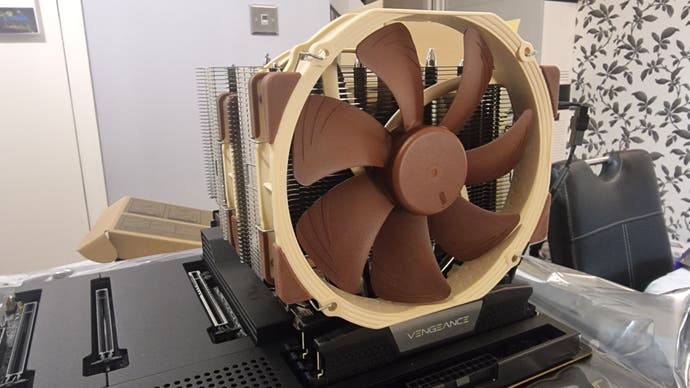
Working with the N7 B650E motherboard was easy, as the SSD heatsink screws off, you slot the drive into its respective M.2 slot, peel the plastic off the heatsink's underside, and screw it back in. Nice and simple so far. The next job was slotting the 7800X3D into place, which was a bit of daunting process, as I've not got the steadiest of hands, and for the life of me, I couldn't get the thought of potentially bending pins out of my head. The CPU slotted in well, thankfully, and then came the fun of installing the NH-D15. Luckily, Noctua provide some rather useful instructions and companion videos to try and prevent even idiots like me for getting it wrong. I applied the included thermal paste in a cross-pattern, and then screwed the cooler down using a ratchet screwdriver, being careful not to apply too much pressure.
It was only then that I took a step back and realised how huge this cooler was, towering at 165mm tall, and that I hadn't checked its compatibility with the H9 Flow. A quick Reddit search offered mixed results of some being able to fit it into the case or not, and Noctua's own compatibility checker pointed to a flat-out refusal of this cooler to fit in the H9 Flow. Then I started to panic, as after putting the RAM into its respective slots, the NH-D15's front 140mm fan barely cleared the RAM slots. At the time I still thought everything would be fine - how wrong I was.
Before going any further, I test-fitted the motherboard into the case to check clearances with the pointy ends of the NH-D15's heatsink and the 140mm front fan in the case. Unfortunately, my own ineptitude got the better of me, and the NH-D15 didn't fit in this current configuration due to how large the fan was. However, I wasn't willing to give up just yet. A panicked email to a Noctua representive laid out my concerns, and they suggested taking the front fan off, so it became an NH-D15S. This did solve the issue, but I at least wanted to see that sweet beige and brown on the front fan somehow - for this, the representative suggested picking up a 120mm fan - the NF-A12x25 PWM - and bolting it to the front in the same way as the original 140mm option. Doing so was simple by salvaging the original mounting clips from the cooler box, attaching them to the sides of the fan, and sliding it into place. At last, sweet beige goodness!
Then came the process of screwing the motherboard down into the case for real, and getting to work on plugging everything in with the power supply, and the even more arduous task of cable management. The H9 Flow, being such a big case, was easy to build in, with lots of space for manoeuvring things around. It's a thoughtfully designed case in front and back, with convenient front I/O totalling a pair of USB-As, a USB-C, headphone jack and power button, as well as lots of ways of hiding unsightly cables, as well as plenty of places for tying them together and routing them. The power supply is mounted in the top of the case, making it easier to access and channel cables where they're needed, as opposed to in one big lump, and the fact that the C1200 comes with a 12VHPWR connector for GPUs such as the 4080 is a handy addition to make sure everything is compatible straight out of the box. Being fully modular was also a godsend for plugging in only what was needed, and making sure it all went where it needed to.
As much as there was a bit of cable spaghetti left, that wasn't necessarily the fault of the power supply's cables and their respective connections. The big pain for managing the cables in this case were the F120 RGB Core fans I'd put together earlier. In this build, there are a total of ten, filling all the available slots - three on the top, bottom and side, and one in the back. Installing them was easy, but it's the fact that each fan comes with a separate RGB and power connector that caused a headache. They each get routed into a separate controller - that's three in total for me - which then plugs into the motherboard. The trouble here is that there isn't enough in the way of dedicated headers for all of the fans to connect up, so I purchased a splitter cable to make it all work. You can't daisy chain these together either, unlike other manufacturers which made things a bit of a headache to work with.
The last piece of the puzzle was GPU installation, which revealed the sheer size of this Strix 4080. It's a hefty beast with a full aluminium construciton and a smattering of classy RGB. Putting into its respective slot was simple enough, especially as I didn't want to faff around with vertical mounting, even if for the aesthetic. Then, it was the moment of truth for turning it on - when I did, it worked, although the USB-C port didn't want to function. That was the only real issue I encountered, apart from having to install the Bluetooth and WiFi drivers from a USB drive for the motherboard. Apart from that, it was reasonably plain sailing.
When fully built, I'm a big fan of the way it all looks, and there is a certain degree of coherence amongst the looks of this machine, with the RGB of the fans and the Strix 4080. The addition of the NH-D15 in its signature beige and brown may not be the best fit for aesthetics, considering Noctua also do it in black, but I wanted it in its original colours for the sake of having some, plus I quite like it. It also runs quiet overall with the NH-D15, although the case fans can make a slight bit of noise - this isn't silent, but it's not exactly a jet engine either.
And now for the moment of truth - benchmarks! How well does my PC perform in a variety of different games? Well, you'll have to go to the next page to find that out.


